Sunday, November 30, 2008

Traffic Monitor with Mikrotik Tools

Monitoring the flow of data packets that pass through the interface Mikrotik router, you can use the facilities Torch. For more information, can be read on Mikrotik Manual, the Torch Tools.

We can monotor the flow of packages based on the type of protocol, address the origin, destination address and port types. With this facility, which has been provided in the Packet System, when we installed Mikrotik RouterOS, the easier we in the administration of the router, form this facility, we can guess whether the flow of data in the machine we are Normal or not. Flooding monitor the occurrence, to monitor the activities Malware, and so forth.

Easy enough to use them, usually to be more comfortable int the Monitorin, please activated throuh Winbox, to enter Router. It view the image below.

Torch this facility can be used through Winbox on the Tools menu - Torch. Please click the menu Torch, the window will be displayed Torch.


It is also through, or IP -ARP. In the ARP List window, please select the IP address, Mac address, which will be in the Monitor. Click the right to enter the Torch.

Note, the items contained in this window Torch, the Manual has been give above is clearly a description of these items. Click the Strat button to activate this service Torch. Now we can joint monitoring againt the flow of packages in the engine router. If ther is supicius traffic please taken further action.

In the above list, i monitor the traffic flow form the IP address (Src address) 192.168.0.13 through the LAN interface. If observed, in the port there Src port 514 (syslog) IP Protocol UDP (17) to the IP address (DST address) 192.168.0.14, and indeed i Syslog Daemon is rouning on a PC running Windows XP is the Remote to save the log router Mikrotik, on the PC that has the IP address 192.168.0.13, with a router that has remote IP address 192.168.0.14, active in the port 514 (UDP). We can choose the source address (Src Address) on the client that we will be watching, Select the port, destination address and Protocol.


Saturday, November 29, 2008

How to Block a Customer (Hotspot) and Tell him to Pay the Bill


Sometimes you may need to cut off a customer and tell him to pay his bill. It's best done by redirecting his http requests to a page with information telling to pay in order to get reconnected. You can do it with a simple destination NAT rule that captures all http requests from a specific address and sends them to a server with webpage telling to pay the bill. However, it's quite easy to make this using the HotSpot feature of RouterOS. Please note that this don't work with PPPoE connections.

To make this setup, you should have Hotspot package enabled on the RouterOS. This example will cover how to block customer's computer. When he tries to open a webpage he would be redirected to the hotspot page which will contain info that he hasn't paid the bill for the Internet access. Your router should have already been configured and working (customer should have access to the Internet), you should have the DNS server specified in the router.

First you should edit the Hotspot login.html page with the text that contains information that will be shown to the customers who haven't paid their bills. It could be something like this: "Service not available, please pay the bill and contact us by phone to get reconnected". This page can be found within the hotspot folder of RouterOS.

Next, add an ip-binding rule that will allow all customers to bypass the hotspot page. It is done using such a command:

/ip hotspot ip-binding add type=bypassed address=0.0.0.0/0 \
comment="bypass the hotspot for all the paying customers"

After that add the Hotspot server on the interface where your clients are connected. It can be done using such command:

/ip hotspot add interface=local disabled=no

Now you can add ip-binding rules for the customers that haven't paid their bill. You can match them by IP address or MAC address. Here is an example using MAC address:

/ip hotspot ip-binding add mac-address=00:0C:42:00:00:90 type=regular comment "Non paying client 1"

Now we have such configuration:

[admin@MikroTik] ip hotspot ip-binding> print
Flags: X - disabled, P - bypassed, B - blocked
# MAC-ADDRESS ADDRESS TO-ADDRESS SERVER
0 P ;;; bypass the hotspot for all the paying customers
0.0.0.0/0
1 ;;; Non paying client 1
00:0C:42:00:00:90

There is one more step to make it work, you should change the order of these rules, the first rule should be above the bypass rule so it could be processed. You can move it using move command:

[admin@MikroTik] ip hotspot ip-binding> move 1 0

Now the ip-binding configuration should look like this:

[admin@MikroTik] ip hotspot ip-binding> print
Flags: X - disabled, P - bypassed, B - blocked
# MAC-ADDRESS ADDRESS TO-ADDRESS SERVER
0 ;;; Non paying client 1
00:0C:42:00:00:90
1 P ;;; bypass the hotspot for all the paying customers
0.0.0.0/0

If the customers can pay their bill using internet you can modify the login.html by adding some links to clients bank web-page where they can pay their bill. After you add these links in the login page you should also add them in the hotspot configuration so the blocked customer could access that page. This can be done in the 'ip hotspot walled-garden ip' menu. Here is an example:

/ip hotspot walled-garden ip add dst-host=www.paypal.com

Setting Up Mikrotik PPPoE Server

This is a straight-forward guide on setting up Mikrotik RouterOS PPPoE service. To use this guide, you should already have Mikrotik RouterOS running and at least level 1 license.

Warning:

This guide will modify your current configurations, the author shall not be held liable for whatever damages including loss or white hairs, resulting from following this guide. You’ve been warned, proceed at your own risk.

1. Login to your Miktrotik router and click on PPP in the left menu.

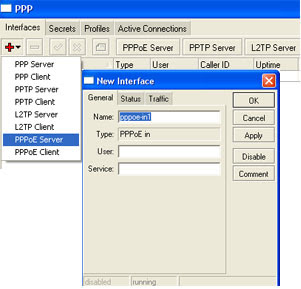
2. Click on interfaces and click the “+” icon then click PPPoE Server, Type in the name or leave it as is and click OK.

3. After creating the PPPoE server incoming interface, click on PPPoE Server button, the PPPoE server list window will then pop-up. Click on the “+” icon, Type in the service name or use the default name, under the interface selection box select the incoming interface or the interface where the PPPoE server will accept incoming connections. Click OK.


4. Now that the PPPoE service is enabled, its time to add a dial-in user. Click on Secrets tab and then click on the “+” icon. Type in the username of the dial-in user you wanted to create and type in the password, under the service select the PPPoE, leave the profile in default value, Type in the ip address of the router under the Local Address box, then type in the IP address to be assigned to the dial-in user. Click OK.


PPPoE Server Testing

1. We have the PPPoE server setup, now its time to establish connection to the PPPoE server. Create a new network connection the same way you create a dialup connection but instead of using a modem, use the PPPoE. Enter the username and password and connect.

Viewing PPPoE connections

1. To view current PPPoE connections in Mikrotik router, click on Active Connections tab.


Tutorial Mikrotik VPN : EoIP

Ethernet over IP (EoIP) Tunneling is a Mikrotik RouterOS protocol that creates an Ethernet turnnel between two routers on top of an IP aconnection. The EoIP interface appears as an Ethernet interface.
When the bridging function of the router is enabled, all Ethernet level traffic (all Ethernet protocols) will be bridged just as if there where a physical Ethernet interface and cable between the two routers (with bridging enabled). This protocol makes multiple network schemes possible.

Network setups with EoIP interfaces:

* Possibility to bridge LANs over the internet
* Possibility to bridge LANs over encrypted tunnels
* Possibility to bridge LANs over 802.11b 'ad-hoc' wireless networks

An EoIP interface should be configured on two routers that have the possibility for an IP level connection. The EoIP tunnel may run over an IPIP tunnel, a PPTP 128bit encrypted tunnel, a PPPoE connection, or andy connection that transports IP. Specific properties:

* Each EoIP tunnel interface can connect with one remote router which has a corresponding interface configured with the same 'Tunnel ID'.
* The EoIP interface appears as an Ethernet interface under the interface list.
* This interface support all features of and Ethernet interface. IP addresses and other tunnels may be run over the interface.
* The EoIP protocol encapsulates Ethernet frames in GRE (IP protocol number 47) packets (just like PPTP) and sends them to the remote side of the EoIP tunnel.
* Maximal count of EoIP tunnels is 65536

This is how to set up EoIP to bridge two (or more) Mikrotik routers for central PPPoE authentication

Using 2 routers called R1 and R2 that have an IP connection between them and R2 has 2ethernet ports, i.e. you can ping R2 form R1 and R1 form R2 where the R1 facing eth port is called eth1 and its other port is called the2.

1. Create a new EoIP tunnel on R1.
2. Create a new EoIP tunnel on R2, where the tunnel ID is the same as the one on R1 but the MAC address are different.
3. Create a new bridge on R1 and R2
4. Add a PPoE server to the Bridge on R1
5. On R2 and add eth2 and the EoIP tunnel to the Bridge.
6. Put an IP address onto eth2 (any address seem to work, but it maybe better to use a different subnet for routing purposes).

Now you should be able to establish a PPPoE connection form a PC plugged into the eth2 port on router R2, this PPPoE connection will terminate on router R1.

This is not the most efficient method of using the available bandwidth on a network, but is perhaps easier that having a PPPoE A/C on every Mikrotik router and using RADIUS as you can just have PPP secrets setup on one router.

Friday, November 28, 2008

How to Block Websites with Mikrotik proxy

This example will explain you “How to Block Web Sites” & “How to Stop Downloading”. I have use Web-Proxy test Package.

First, Configure Proxy.

/ip proxy
enabled: yes
src-address: 0.0.0.0
port: 8080
parent-proxy: 0.0.0.0:0
cache-drive: system
cache-administrator: "ASHISH PATEL"
max-disk-cache-size: none
max-ram-cache-size: none
cache-only-on-disk: no
maximal-client-connections: 1000
maximal-server-connections: 1000
max-object-size: 512KiB
max-fresh-time: 3d

Now, Make it Transparent

/ip firewall nat
chain=dstnat protocol=tcp dst-port=80
action=redirect to-ports=8080

Make sure that your proxy is NOT a Open Proxy

/ip firewall filter
chain=input in=interface= src-address=0.0.0.0/0
protocol=tcp dst-port=8080 action=drop

Now for Blocking Websites

/ip proxy access
dst-host=www.aaa07.com action=deny

it will block website http://www.aaa07.com, we can always block the same for different networks by giving src-address. it will block for particular source address.

we can also stop downloading files like .mp3, .mp4.....,etc

/ip proxy access
path=*.mp3 action=deny
path=*.mp4 action=deny

try with this also

/ip proxy access
dst-host=:mail action=deny

this will block all the websites contain word "mail" in url.

Example: it will block www.hotmail.com, mail.yahoo.com,.....


Wireless Hotspot Server topology Mikrotik

The MikroTik HotSpot Gateway enables providing of public network access for clients using wireless or wired network connections.HotSpot Gateway features:

authentication of clients using local client database, or RADIUS serveraccounting using local database, or RADIUS server

Walled-garden system (accessing some web pages without authorization)

Quick Setup Guide

The most noticeable difference in user experience setting up HotSpot system in version 2.9 from the previous RouterOS versions is that it has become in order of magnitude easier to set up a correctly working HotSpot system.

Given a router with two interfaces: Local (where HotSpot clients are connected to) and Public, which is connected to the Internet. To set up HotSpot on the Local interface:

first, a valid IP config is required on both interfaces. This can be done with /setup command. In this example we will assume the configuration with DHCP server on the Local interface

valid DNS configuration must be set up in the /ip dns submenu

To put HotSpot on the Local interface, using the same IP address pool as DHCP server uses for that interface: /ip hotspot add interface=local address-pool=dhcp-pool-1

and finally, add at least one HotSpot user: /ip hotspot user add name=admin

These simple steps should be sufficient to enable HotSpot system

Please find many HotSpot How-to's, which will answer most of your questions about configuring a HotSpot gateway, at the end of this manual. It is still recommended that you read and understand all the Description section below before deploying a HotSpot system.for complete configuration please visit:http://www.mikrotik.com/testdocs/ros/2.9/ip/hotspot.php

Local Users via Radius Authentication Server


This manual discusses how to make two users ex and ex2 which are members of different groups and are authenticated with RADIUS.

For the purposes of this manual we use Debian GNU/Linux system and FreeRADIUS RADIUS server. Both these products are free software.

*** Mikrotik Router Configuration

Configure the router with proper RADIUS server connection parameters.

[admin@Mikrotik] radius> add service=login address=1.1.1.1 secret="xxx" disabled=no
[admin@Mikrotik] radius> print detail
Flags: X -disabled
0 service=login called-id="" domain="" address=1.1.1.1 secret="xxx"
authentication-port=1812 accounting-port=1813 timeout=300ms accounting-backup=no
[admin@Mikrotik] radius>

Enable local user authorization service to use RADIUS server

[admin@Mikrotik] user aaa> set use-radius=yes
[admin@Mikrotik] user aaa> print
use-radius: yes
accounting: yes
interim-update: 0s
default-group: read
[admin@Mikrotik] user aaa>

*** FreeRADIUS server installtion and Configuration

Install FreeRADIUS server package

root@wildcat:/etc# apt-get install freeradius
Reading Package Lists... Done
Building Dependency Tree... Done
Suggested packegaes:
freeradius-Idap freeradius-mysql freeradius-krb5 freeradius-iodbc
The following NEW packages will be installed:
freeradius
0 upgraded, 1 newly installed, 0 to remove and 269 not upgraded.
Neet to get 0B/1788kB of archives.
After unpacking 4362kB of additional disk space will be used.
Selecting previously deselected package freeradius.
(Reading database ... 60006 files and directories currently installed.)
Unpacking freeradius (from .../freeradius_0.9.3-1_i386.deb) ...
Setting up freeradius (0.9.3-1) ...
Group freerad does already exist as a system group. Exiting...
freerad: freerad shadow
Restarting FreeRADIUS daemon: Stopping FreeRADIUS daemon:
freeRADIUS.
Starting FreeRADIUS daemon: Tue Sep 14 10:50:30 2--8 : infor:
Starting
- Reading configuration files...
freeradius.

root@wildcat:/etc#

Open the files /etc/freeradius/clients.conf and add the following record:

client 1.1.1.3 {
secret = xxx
shortname = xxx
}

This record represents reachable MT router's address (src-address of packets coming form MT router).

Open the file /etc/freeradius/users and add the following line:

ex User-password=="ex"

This adds user named ex which will belong to the default group specified under /user aaa submenu.

To add a user which belongs to the group other then default, you need to supply Group attribute to the router.
Open /etc/freeradius/users file once more and add second user named ex2 which will be the member of group full.

ex2 User-password =="ex2"
Group = "full"

Do not forget to update FreeRADIUS dictionary with additional attributes! Open /etc/freeradius/dictionary file and add the following:

VENDOR Mikrotik 14988

ATTRIBUTE Recv-limit 1 integer Mikrotik
ATTRIBUTE Xmit-Limit 2 integer Mikrotik
ATTRIBUTE Group 3 string Mikrotik
ATTRIBUTE Wireless-Forward 4 integer Mikrotik
ATTRIBUTE Wireless-Skip-Dot1x 5 integer Mikrotik
ATTRIBUTE Wireless-Enc-Algo 6 integer Mikrotik
ATTRIBUTE Wireless-Enc-Key 7 string Mikrotik
ATTRIBUTE Rate-Limit 8 string Mikrotik

Restart FreeRADIUS server.

root@wildcat:/etc# /etc/init.d/freeradius restart
Restring FreeRADIUS daemon: Stopping FreeRADIUS daemon:
freeradius
Starting FreeRADIUS daemon: Tue Sep 14 12:02:05 2008 : info:
Starting
- reading configuration files ...
freeradius.
root@wildcat:/etc#

===================
Configuration testing

To test the configuartion log on to your router as whether ex or ex2 user. Note, that user ex has only read permissions while on the contraty user ex2 has full permission, exempli gratia he can create new users.