This is a straight-forward guide on setting up Mikrotik RouterOS PPPoE service. To use this guide, you should already have Mikrotik RouterOS running and at least level 1 license.
Warning:
This guide will modify your current configurations, the author shall not be held liable for whatever damages including loss or white hairs, resulting from following this guide. You’ve been warned, proceed at your own risk.
1. Login to your Miktrotik router and click on PPP in the left menu.
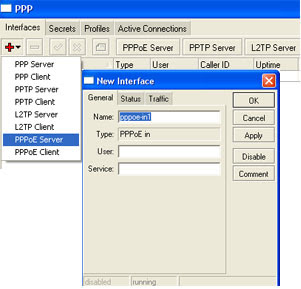
2. Click on interfaces and click the “+” icon then click PPPoE Server, Type in the name or leave it as is and click OK.

3. After creating the PPPoE server incoming interface, click on PPPoE Server button, the PPPoE server list window will then pop-up. Click on the “+” icon, Type in the service name or use the default name, under the interface selection box select the incoming interface or the interface where the PPPoE server will accept incoming connections. Click OK.

4. Now that the PPPoE service is enabled, its time to add a dial-in user. Click on Secrets tab and then click on the “+” icon. Type in the username of the dial-in user you wanted to create and type in the password, under the service select the PPPoE, leave the profile in default value, Type in the ip address of the router under the Local Address box, then type in the IP address to be assigned to the dial-in user. Click OK.
PPPoE Server Testing
1. We have the PPPoE server setup, now its time to establish connection to the PPPoE server. Create a new network connection the same way you create a dialup connection but instead of using a modem, use the PPPoE. Enter the username and password and connect.
Viewing PPPoE connections
1. To view current PPPoE connections in Mikrotik router, click on Active Connections tab.

No comments:
Post a Comment